

Hey everyone! First-time blogger here, battling a PDF problem. Is anyone else tired of wading through documents just to find one piece of info?
In recent days, my workload involving PDFs has skyrocketed. Often, to find just a few key pieces of information, I’m forced to either read entire documents or embark on time-consuming searches for specific sections. This not only frustrates me but also impacts my ability to complete other tasks.
As someone familiar with AI technologies, I’ve noticed a growing trend: businesses are leveraging AI to develop innovative solutions and integrate them into existing products. This sparked an idea: what if I could build a tool that allows users to upload PDFs, ask specific questions, and instantly retrieve the information they need, eliminating the need to waste time sifting through large documents?
This is just one example of how AI can revolutionize our work processes. By harnessing its power, we can streamline tasks and free ourselves to focus on more strategic initiatives.
I hope this resonates with some of you! I’m curious to hear your thoughts on AI-powered solutions for tackling PDFs. Feel free to leave a comment below!
In this blog, I’m diving into the Node.js backend side of things—exploring the tech I’ve used and my problem-solving approach. Ready to delve in?
Pre-requisites
- Access Credentials: Make sure you have either an OpenAI API key or credentials for the Gemini service.
- Software Installed: Ensure you have npm, Node.js, and Docker installed on your system. These are essential tools for running and managing your project.
- Basic Knowledge: Having a basic understanding of Node.js, Docker, PostgreSQL, and Langchain will be helpful as you go through the setup process.
Now, let’s move on to setting up and configuring your project:
Setup & Configuration
- Initialize Node Project: Begin by setting up your Node.js project using the command npm init. This will initialize your project and create a package.json file with default settings.
- Configure Docker Compose: Create a docker-compose.yml file to define the configuration for PostgreSQL and pgAdmin, which are essential components of your application’s infrastructure.
First, we define the connection options, specifying the type of database (PostgreSQL), the host (usually “localhost”), and the port number (typically 5432, the same as in our Docker Compose file).
export const getVectorConfig = (tableName) => {
    const vectorConfig = {
      postgresConnectionOptions: {
        type: "postgres",
        host: "localhost",
        port: 5432, //same port number as docker-compose file
        password: {password},
        database: {database},
        user: {user},
      },
      tableName,
      columns: {
        idColumnName: "id",
        vectorColumnName: "vector",
        contentColumnName: "content",
        metadataColumnName: "metadata",
      },
    };
    return vectorConfig
  };
Next, we provide the credentials needed to access the database: the password, database name, and user.
Then, we specify the table name where the data will be stored in the database.
For each column in the table, we specify its name and what type of data it will hold.
- The vectorColumnName will store the generated vector representations of the content.
- The contentColumnName will store the actual content extracted from the PDF.
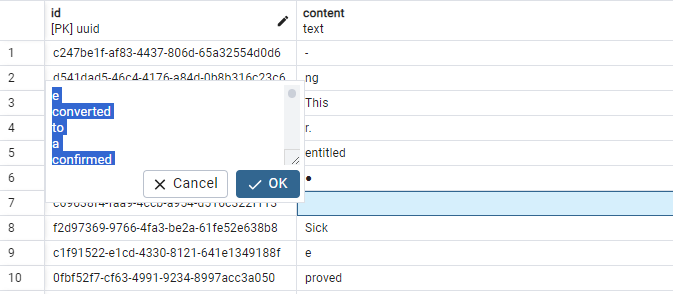
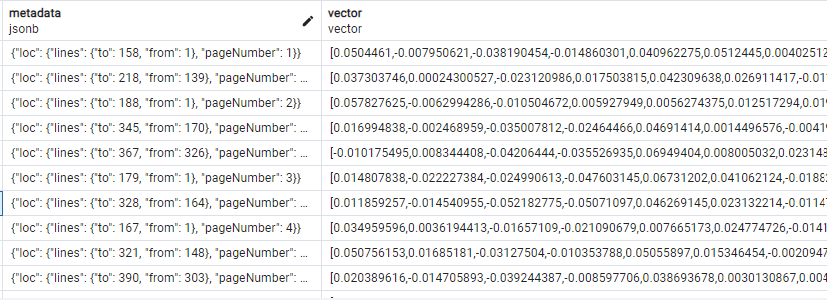
- The metaDataColumnName will store any additional metadata about the processed chunks, such as page number, start line, end line, and so on.

By configuring these parameters, we’re ensuring that LangChain can efficiently store and retrieve the data we need from the PostgreSQL database. For more detailed information, you can refer to the LangChain official documentation.
Upload functionality
First, we create a PDF loader instance by providing the file path and specifying that we want to split pages.
  const loader = new PDFLoader(filePath, {
          splitPages: true,
        });

        const docs = await loader.load();
        const splitter = new CharacterTextSplitter({
          separator: "",
          chunkSize: 1000, // how big the context is in one page
          chunkOverlap: 100, // how much from the previous page do we want to overlap in the current page
        });       const splitDocs = await splitter.splitDocuments(docs);
Then, we load the document, and by default, all the content appears on a single page. To organize it better, we split the pages.
Next, we set the parameters for splitting the text into manageable “chunks”:
- chunk size determines the maximum number of characters (or tokens) allowed in each chunk. This ensures that chunks are of a manageable size.
- chunkOverlap specifies how much of the previous page overlaps with the current one in terms of characters (or tokens). A higher value means more overlap, facilitating smoother transitions between chunks.
By configuring these parameters, we ensure that the text is divided into chunks efficiently, making it easier to process and analyze.
        const docWithCustomMetaData = splitDocs.map((doc) => {
          const dataToReturn = {
            ...doc,
            metadata: {
              loc: {
                ...doc.metadata.loc,
              },
            },
          };
          return dataToReturn;
        });
In this snippet, we streamline the metadata for each split document by filtering out unnecessary fields. We focus on retaining only essential metadata like page number, start line, and end line, making the structure more manageable for further processing.
- Embedding Creation:
- We first retrieve the vector configuration using getVectorConfig(fileName + “_pdf”). This ensures the table name in the database reflects the uploaded file name.
- We create an instance of GoogleVertexAIEmbeddings (assuming you’re using Google Vertex AI for embedding generation).
- Data Upload and Storage:
- The core functionality happens with PGVectorStore.fromDocuments. This function takes three arguments:
- docWithCustomMetaData: The collection of text chunks with their page location data (prepared earlier).
- embeddings: The instance of GoogleVertexAIEmbeddings is responsible for generating the vector representations.
- vectorConfig: The configuration object containing database connection details and column definitions.
- PGVectorStore.fromDocuments performs the following actions:
- It creates a table in your PostgreSQL database with a name based on the uploaded file (fileName_pdf).
- Inside the table, it creates the four columns defined in vectorConfig:
- idColumnName, vectorColumnName, contentColumnName, metadataColumnName
- It then iterates through the docWithCustomMetaData, generates embeddings for each chunk’s content using the embeddings object, and stores the complete data (embeddings, content, and metadata) in the newly created table.
Note : While this approach works for initial prototyping, it might not scale well for managing large tables in production. Consider using a more established database management system for long-term scalability and complex table structures.
Chat / Retrieval part
Now, let’s move on to the question and answering (Q&A) or retrieval part, where we enable interaction with our PDF document.
To begin, we initialize the pgVectorStore by providing the embeddings and vectorConfig as attributes.
For prompting, we’re utilizing the ChatPromptTemplate approach. This template facilitates interaction by first presenting a prompt and then allowing the user to input their query for extracting data from the PDF.
The SYSTEM_TEMPLATE is structured to guide the user effectively:
export const SYSTEM_TEMPLATE = `Use the following pieces of context to answer the question comprehensively and informally and provide instructions where relevant. Prioritize accuracy and clarity over brevity. and always highlight important keywords/number
in bold.\n
{context}
`;
This template ensures that users are guided to provide clear and accurate queries, enhancing the effectiveness of the Q&A process.
        const pgVectorStore = await PGVectorStore.initialize(
        embeddings,
        vectorConfig
        );

        const vectorStoreRetriever = pgVectorStore.asRetriever();

        const messages = [
        SystemMessagePromptTemplate.fromTemplate(SYSTEM_TEMPLATE),
        HumanMessagePromptTemplate.fromTemplate("{question}"),
        ];

        const prompt = ChatPromptTemplate.fromMessages(messages);
Feel free to tweak the prompt as needed for your desired output. You can also explore other prompt methods from the Langchain documentation to find the best fit for your application.
const chain = RunnableSequence.from([
        {
            context: vectorStoreRetriever.pipe(formatDocumentsAsString),
            question: new RunnablePassthrough(),
        },
        prompt,
        model,
        new StringOutputParser(),
        ]);
const answer = await chain.invoke(input);
Initializing pgVectorStore:
We’ve already discussed this in the previous section. Here, PGVectorStore.initialize likely establishes a connection with the database and prepares the retrieval functionality using the provided embeddings and vectorConfig.
Creating the Retriever:
Once pgVectorStore is initialized, we call the asRetriever method on it. This creates a dedicated object (vectorStoreRetriever) specifically for handling information retrieval tasks.
Crafting the Prompt Messages:
We define an array of messages (messages) that will be combined to form the final prompt. Here’s what each message contributes:
- The first message uses SystemMessagePromptTemplate.fromTemplate(SYSTEM_TEMPLATE). This likely injects the pre-defined SYSTEM_TEMPLATE (containing general instructions) into the prompt.
- The second message uses HumanMessagePromptTemplate.fromTemplate(“{question}”). This creates a placeholder for the user’s actual question that will be inserted later.
Building the Final Prompt:
Finally, we use ChatPromptTemplate.fromMessages(messages) to combine the individual messages (SystemMessagePromptTemplate and the user’s question) into a comprehensive prompt. The retrieval system will use this prompt to search the stored data and identify the most relevant information based on the user’s query.
This code constructs a user-specific prompt that incorporates both general retrieval instructions and the user’s question to guide the information extraction process from the uploaded and processed PDF data.
const pdfResult = await pgVectorStore.similaritySearch(input, 2);
const metaData = pdfResult.map((data) => data.metadata.loc);
return response.send({
message: answer,
citation: metaData,
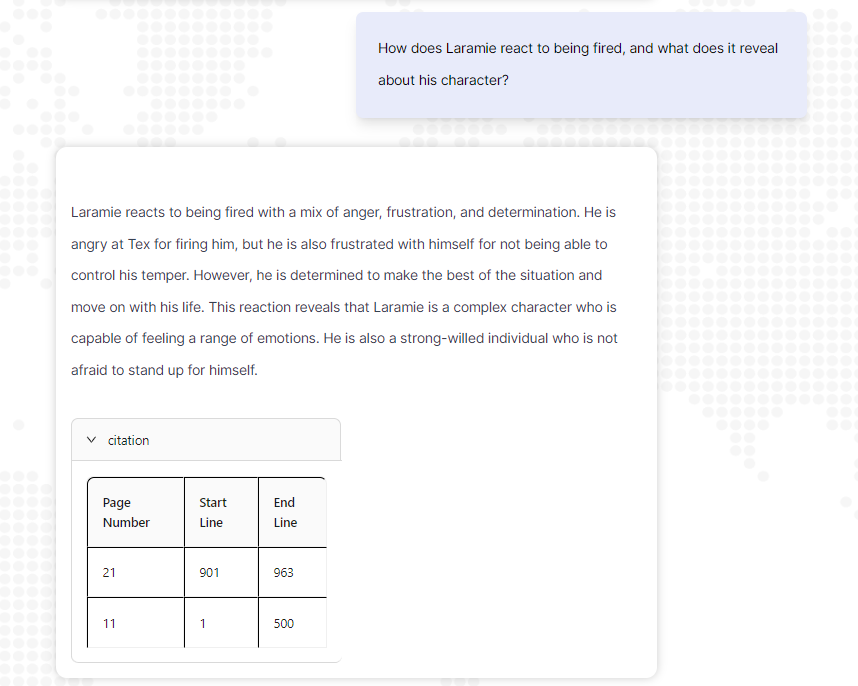
});In this segment, we’re employing the similaritySearch function to retrieve relevant citations based on the user’s input. These citations provide information about the location in the document from which the data was extracted, including the page number, start line and end line.
After obtaining the citations, we structure the response to include the retrieved answer and the corresponding citation data. This response is then sent back to the user, allowing them to access both the retrieved answer and the citation details.
By incorporating these components into the response, users can seamlessly access the answer to their question along with the necessary citation information, enhancing their overall experience with the application.
In the example below, I’ve uploaded the Easy Come, Easy Go short story Book PDF, and posed a question. In response, I’ll receive both the answer and the citation.
Use cases that we use in Dataslush:
- Contract Review: Find specific terms, clauses, or dates in contracts for faster analysis.
- Research & Due Diligence: Quickly retrieve key findings or data points from research reports.
- Customer Support: Search knowledge base articles for faster and more accurate answers.
- Compliance Auditing: Easily locate relevant sections or data points in regulatory documents.
- Employee Onboarding: Quickly search through employee handbooks or benefits guides for specific information.
- Summarize PDFs: Automatically generate summaries of uploaded PDFs, giving users a quick grasp of key points.
- Document Comparison: Analyze similarities and differences between two different PDFs, highlighting key variations in content.
For those interested in exploring the full code implementation, you can find it in the following gist file: Gist File
Feel free to delve into the code and customize it to suit your specific needs. Happy coding!